
About our packrafts
- What is a packraft?Packrafters are incredibly lightweight and sturdy inflatable boats with a low packing volume. This makes it easy to travel in Norwegian nature. You can easily take your packraft with you in your backpack. They weigh only 2-4 kg and can be packed down to the size of a sleeping bag.
Packrafts can be used wherever there is water, and the only limit is your imagination. Many people prefer to use packrafts rather than kayaks and canoes. This is because the possibilities are so many with incredible durability, low weight and small packing volume. You can easily transport your packraft wherever you want, and if you like fishing, you can reach areas you could previously only dream of. What's more, the packraft takes up minimal space when you need to store it for the winter.
Packrafts are incredibly sturdy and can withstand a lot of weight. You can take your dog with you in your packraft or a large backpack on the front.
More suppliers have entered the market. We know some use materials and solutions that literally don't hold water. Watch out for these.
Would you like to look at the packrafters? We have a showroom in Oslo (Olaf Schous vei 8D) Remember to make an appointment by e-mail/phone before you come.
- Are Kipara models as good as other well-known brands?The production and materials are of the highest quality and the packrafters have the same production as other serious suppliers. 2026 will be our 9th year and Kipara has proven to be one of the best on the market. We have also won tests compared to other «world» brands.
Some other important points:
- We buy directly from the factory in China
- We buy many packrafters and therefore get good discounts
- We have low costs and little administration
The costs we save are passed on to our customers in the form of lower prices for good products.
What a customer says:
“Having paddled other pack rafts for a long time, I was a little skeptical about buying a raft that was so much cheaper than I was used to. I quickly discovered that there was nothing to worry about. It can withstand just as much, has better attachment options, a better valve solution, is better and faster to paddle with and feels more comfortable to sit in than the ones I've had before. I've just come from a week's trip with both rapids and still water paddling, and my friend who is a better paddler and has a raft that is a third more expensive struggled to keep up. You can safely spend your money here to get a safe and solid product.”
- What kind of materials are used in the packrafters?For 2025/2026, we carry a number of models that are mainly divided into 4 groups: Rávdu, Jávri, Char and Char Kevlar.
- PVC - Rávdu series. Affordable and heavier material compared to Nylon TPU. Does not withstand as much as the TPU models
- An upgraded standard Nylon TPU material - Jávri series. Approximately 75-80% of tensile strength compared to Nylon 66 TPU
- Nylon 66 TPU (This is not carried by other «Scandinavian» brands) - Char series. This is the most expensive and best packraft material to put it simply.
- Nylon 66 420D TPU together with Kevlar at the bottom - Char Kevlar series. By far the strongest packing force
- Are the packrafters safe?Yes, the packrafters are very solid and sturdy.
Many people are surprised by how safe they feel in a packraft.
Quote from Tursiden.net: “Stable and maneuverable are two key words that describe paddling a packraft. Since you sit at the bottom and it's relatively wide compared to a kayak, it seems immediately stable. It didn't take many paddles to realize that it's easy to maneuver. The packing power reminded me a bit of a river kayak. Easy to turn...”
Kipara offers a 3-year warranty on all our packraft models.
- What are the differences between the different models?Char: This is the top model, developed in collaboration with Lars Monsen. Best design and best materials: Imported Nylon 66 with super-strong layers of urethane. The materials used in Char are very expensive. This shows in the price. Char has proven to be a very safe choice for several years. It is also the lightest with the lowest volume when it comes to packing power in your backpack. «Best in test»
Char Kevlar. This is the extreme version of Char. Same design, but Kevlar in the floor and Nylon 66 420D TPU in the tubes.
Jávri: This has proven to be the best packraft in the middle segment. The only packraft other than Char that received 5.5 out of 6 possible points in «Jakt og Fiske»'s large width test of packrafts in 2022. "We have upgraded a standard TPU material that has proven to be incredibly durable. This material is only available from Kipara. The models are balanced and very good all-round packrafts that fit everything. In addition, we use the best material in the floor. Same as the Char models.
Ravdu: New series in 2024. These are made of PVC and are meant to be safe and secure choices, but are more affordable compared to the Jávri and Char series. A budget packraft with good design and high features. PVC weighs more than TPU and will not be as strong, but it is solid. The 2026 models are upgraded with even stronger floors. How much stronger compared to 2025? Approximately double the strength.
In addition, we have some other models, but under each product it will be explained what these are made of and what the intended use is.
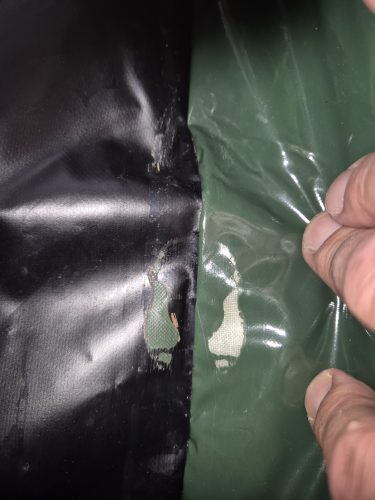
- It looks like the glue is starting to come loose on the inside of the splash cover and floor of my new packrafter. What is happening?The glue is not coming loose! During production, the splash guard is welded to the packrafter. When they weld, they use a double-sided tape to keep the splash guard and floor in place. This is the tape you see. This tape has no other mission than to keep things in place during welding. This does not affect the packing force. It's completely normal.
- Maintenance and use of Tizip
And TIZIP zipper On a packraft is very robust – but only if used and maintained correctly. Many problems (leaks, sluggishness, wear and tear) are actually caused by incorrect use over time.
Here is a practical guide that will make your zipper last much longer:
Proper use in the field
Always close completely correctly
- Slide the lock all the way to the end of the line – even 1–2 mm open can cause leakage
- You should clearly know “stop” when it is closed
- Don't trust “almost closed”
Avoid zipper tension
- Do not sit or place weight directly on it
- Avoid packing so tightly that the zipper is stretched
- On the packraft: distribute luggage so it doesn't press on the zipper
This is one of the most common causes of cracks.
Open/close correctly
- Use to hinder:
- I am holding the fabric straight
- he pulls the slider
- Pull straight – do not twist or “bend” the zipper
Never force it
If it is slow:
- Don't pull harder
- Then you can permanently destroy the sealing profile
Cleaning (very important)
Sand and dirt are the main enemies.
After the tour:
- Rinse with fresh water (especially after saltwater)
- Feel free to use a soft brush (e.g., a toothbrush)
- Make sure there is no sand in the tracks
This alone can double its lifespan.
🧴 Lubrication
Use the correct type of lubrication regularly:
- TIZIP own grease or silicone-based zipper lubricant
- Lightly grease the entire profile
- Open/close a few times to distribute
How often?
- After 5–10 uses
- Always before long trips
- After cleaning
Cold and temperature
- In the cold, the zipper can become stiff
- Avoid opening/closing if it's freezing cold and dry
- Warm it a little with your hands first
Storage
- Store half-open or slightly closed
- Not completely closed for a long time → can deform the seal
- Store dry and away from pressure on the zipper
⚠️ Signs of trouble
Look for:
- Tremor or “jerky” movement
- Air leak
- Small cracks in the tape
- That it “opens up” a little after closing
Don't delay – small problems quickly become big ones.
🧭 Quick mnemonic
- Smurt → Riktig lasting → Forsiktig håndtering
A crack TIZIP zipper (often used on drysuits, packrafts, waterproof bags, etc.) that leaks air is unfortunately quite a serious problem – but what you can do depends on where the damage is and how critical the seal is.
🔍 First: what kind of damage is it?
- Small tear/hole in the “tape” itself (the fabric around the zipper) possible to repair temporarily
- Damage to the gear rack / plastic profile itself difficult to fix permanently
- Leaks without visible damage can be dirt, wear, or lack of lubrication
🛠️ Possible solutions
1. Temporary repair (often works okay)
If there is a small tear in the tape:
- Use Aquasure / Seam Grip (Push-lim)
- Or Tear-Aid (Type A or B depending on material)
- Clean the area thoroughly first (isopropanol or mild soap)
- Add from both sides if possible
This can actually hold up pretty well for air/water tightness – but is rarely permanent.
2. Maintenance (if it's “only” leaking)
Sometimes it's not a crack:
- Clean the zipper carefully (sand and dirt are common causes)
- Butter with TIZIP lubricant / silicone-based zipper grease
- Lock and unlock several times
Surprisingly often, this solves small leaks.
3. Professional Repair / Replacement
If:
- The zipper is cracked in the plastic profile itself
- Still leaking after maintenance
Then, usually, the person must replaced completely
This is done by:
- Drysuit repair
- Packraft Manufacturers / Specialist Workshops
💰 Important: This is often expensive (can cost several thousand kroner) because the zipper needs to be reheated and re-glued.
⚠️ Important to know
- TIZIP zippers are not designed for permanent repair at home
- A bad repair can lead to sudden failure (especially dangerous in a dry suit)
- For critical use (diving, cold water): don't trust DIY fixes
🧭 What I would do
- Small holes → repaired with Aquasure as a temporary solution
- Critical equipment → sent for professional repair
- Large tear in zipper → consider replacement or new product
- Sport Outlet - Lars MonsenWe are the ones supplying the packrafts to Sport Outlet under the Lars Monsen brand. Sport Outlet is selling the 2025 models this year (2026). These are equivalent to our Rávdu series, but usually in different sizes.
- Packrafts made of PVCFor packrafts made of PVC, it is very important to dry them thoroughly after use and before rolling them up, if necessary. This is because PVC isn’t as stable as TPU. It’s easily affected by the environment, and the outer coating can tear off easily. This is especially true for the tubes. Therefore, make sure the packraft is completely dry before packing it up.
- Packraft manual
PACKAGE INSTRUCTION FOR PACKRAFT
- BEFORE YOU USE THE PACKRAFT
Read the user manual carefully before using the packraft. Here you will find important information about safe use, assembly, maintenance and storage.
Keep the user manual for future reference.
- SAFETY
Kayaking always involves a certain risk. Familiarize yourself with the packraft and its equipment before setting off on a trip, and adjust its use to your own skills and the conditions on the spot.
For the safest possible use:
- Always use a suitable and properly fitted lifejacket.
- Check the packraft, valves, and accessories before each trip. Do not use the packraft if it has any damage or leaks that could affect safety.
- Always consider weather, wind, current conditions and water temperature before venturing out on the water. Conditions can change quickly.
- Customize the trip according to your own skills and experience. Be especially careful when kayaking in cold water, strong currents, rivers, and rapids.
- Do not exceed the packraft's maximum load capacity. See the model specifications in this user manual.
- Keep the packraft away from sharp objects, pointed rocks, and other conditions that could damage the tubes or the bottom.
- Children must be supervised by an adult when using the packraft.
- Always follow local rules and regulations regarding navigation on the water.
- TECHNICAL SPECIFICATIONS
This comes with:
1 × packraft
1 × inflatable seat
1 × inflatable back support
1 × steering fin
1 × pump bag
1 × storage bag
1 × fastening strap for bundling
1 × repair kitNote: The rope is not included.
See Kiparapackraft.com for specifications for your model.
- BEFORE THE FIRST USE
Before the first use, the packraft and the accompanying equipment must be inspected for damage and leaks. First inflate the seat and backrest, then the packraft.
Check the tubes, the bottom, the connections, the fixing points and the valves.
If leakage is suspected, the area can be checked with soapy water. Air bubbles that continue to form can indicate a leak.
Do not use the packraft if you notice any damage or leaks that could affect safety.
- INSTALLING SEAT AND BACKREST
The seat and back support must be inflated and mounted before the packraft itself is inflated, as they can be difficult to fit in place when the boat is fully inflated.
Seat
- Inflate the seat with your mouth, a pump bag, or an electric pump through the one-way valve.
- Place the seat at the back of the packraft and secure the strap in the base fixing point so that the seat stays in place.
- Adjust the amount of air according to the desired seating comfort.
Back support
- Open the valve on the permanently attached air tube, blow up the backrest with your mouth and tightly close the valve.
- Fasten the two straps to the back support in the fixing points at the back of the packraft.
- Adjust the straps and the amount of air until you get a comfortable sitting position and good support.
- CLEANING AND DEBRIS REMOVAL
All KIPARA packrafts come with a pump bag for inflation. You can also use a rechargeable pump, which is sold separately. When using an electric pump, it is recommended to have the pump bag with you as an extra safety measure in case the battery runs out.
Roll out the packraft on a clean and level surface. Ensure that the surface is free of sharp rocks, branches, and other objects that could damage the material.
- Open the main valve completely. The one-way valve should not remain in the opening. Screw the pump bag onto the valve. When using an electric pump, select a nozzle that fits the valve.
- Open the pump bag and fill it with air.
- Close the opening on the pump bag and press the air into the packraft.
- Repeat until the packraft has taken the correct shape and the air starts to seep back between each filling.
- Unscrew the pump bag from the valve and quickly close the main valve, so that as little air as possible escapes.
- Turn off the nozzle on the pump bag so that you can use the one-way valve. Fill the pump bag with air and refill the packraft.
- If necessary, you can refill with your mouth through the one-way valve.
- Close the valve completely and make sure it is seated correctly before putting the packraft in the water.
The packraft should be firm and retain its shape, but should not be filled with so much air that unnecessary high pressure builds up in the tubes.
Air pressure and temperature
The air pressure in the packraft is affected by the temperature. When an inflated packraft is placed in cold water, the air in the tubes cools down and the pressure can drop. The packraft can therefore feel softer after a few minutes of paddling. In that case, go ashore and refill the air if necessary.
The air pressure can also increase if the packraft is left in strong sunlight or high temperatures. Check the packraft regularly and release some air if the tubes become very hard. This reduces the risk of injuries caused by too high pressure.
- INSTALLATION AND USE OF THE SPRAY TANK
If the packraft has a fixed spray attachment with a strap that protects the paddler and the inside of the packraft from water and spray. When the spray attachment is not in use, it can be rolled aside.
- Roll out the spray and check that it is placed correctly and not twisted.
- Get into the packraft and attach the spray cover around the seating area.
- Snurp closes the opening around the body so that the cover fits comfortably and provides the desired protection against water and spray.
- Make sure the spray trigger is positioned evenly and does not obstruct movement.
When the spray strip is not to be used, loosen the strap and roll the strip aside. Attach it so that it does not lie loose or get in the way during paddling.
- INSTALLATION AND USE OF FIND
The Finn helps to keep the packraft on course during paddling.
- Wet the fin with water before assembly to reduce friction, then slide it into the fin attachment under the packraft.
- Make sure the fin is properly attached and securely fastened before putting the packraft on the water.
- If the construction allows it, the fin can be secured with a rope to a suitable attachment point on the packraft.
Remove the fin when paddling in very shallow water, where it can come into contact with rocks or the bottom. The fin must also be removed before the packraft is pulled ashore, so that the fin and the fin attachment are not damaged.
- LAST AND BAGGAGE
- Do not exceed the packraft’s maximum load capacity. The load capacity includes paddles, luggage and other equipment. See the technical specifications for your model on kiparapackraft.com
- Distribute the weight as evenly as possible to maintain good balance and stability.
- Secure all luggage and loose equipment so that it cannot shift or fall out during paddling. Exterior luggage should be attached to the packraft's calculated attachment points.
- Avoid placing sharp or pointed objects directly against the tubes or the bottom. Pack such objects securely to reduce the risk of puncture and other damage.
- USE ON WATER AND ON LAND
- Choose a suitable place to get into and exit the packraft. Avoid having the bottom come into contact with sharp rocks or other objects.
- Be extra careful when paddling in shallow water and in areas with rocks, branches or other obstacles that could damage the bottom or the tubes.
- Do not use the oars to push or pull the packraft over rocks or other obstacles.
- Lift the packraft after the handle inside the packraft when moving it on land. Do not lift the packraft after the spray line, as this can damage the line. Do not drag a loaded packraft over the ground, as this can lead to unnecessary wear or damage to the bottom.
- REPAIR
For longer trips, it is recommended to bring the packraft repair kit, which is adapted to the packraft's material.
Repair of minor holes
- Inflate the packraft and locate the leak. If necessary, you can use soapy water to find small leaks. Mark the area and then deflate the packraft.
- Clean and dry the area thoroughly. The surface must be clean and dry before the repair is carried out.
- Choose a repair patch that is suitable for the area to be repaired. Place the patch over the hole and mark the area around it.
- Follow the instructions for the adhesive regarding application and drying time. Apply the adhesive to the repair area and follow the instructions on the label.
- Press the adhesive well into place and iron from the center outwards to remove any air pockets, creases, and wrinkles.
- Let the repair cure according to the instructions for the adhesive before inflating the packraft and using it again.
Major injuries
Larger tears, damage in joints or damage around valves should not be repaired in the same way as smaller holes. Contact the retailer if you are unsure whether the damage can be repaired.
The packraft should not be used until the damage has been properly repaired.
- CLEANING, MAINTENANCE AND STORAGE
- Rinse the packraft with fresh water after use, especially after use in salt water.
- Remove sand, mud and other dirt.
- If necessary, use a mild cleaning agent. Avoid strong chemicals and solvents.
- Let the packraft dry completely before packing it up.
- Check valves, connections/welds, and fasteners regularly.
- Empty the packraft of air and roll it or fold it without sharp creases.
- Store the packraft dry and protected from direct sunlight, strong heat, sharp objects, and heavy loads.
- Troubleshooting
The packraft is leaking a little air
Possible cause: Temperature change, for example when launching in cold water.
Action: Refill air as needed.The packraft continues to leak air
Possible cause: Leakage or a problem with the valve.
Action: Check the valve and perform a leak test.The valve is leaking
Possible cause: Dirt or a valve that is not seated correctly.
Action: Check and clean the valve.Seat or back support leaks air
Possible cause: Leakage or a problem with the valve.
Action: Check the valve and look for any leaks.The Finn sits loosely or loosens
Possible cause: Incorrect assembly.
Action: Check that the fin is correctly mounted in the fixture.Visible tape on welded areas
On some models, remnants or edges of tape may be visible on the inside when sprayed or on the floor. The tape is used to hold the materials in place during production before the parts are welded together. Visible tape therefore does not in itself mean that a joint has come loose.
See our YouTube channel for more tips:
PACKRAFT USER MANUAL
- BEFORE USING YOUR PACKRAFT
Read this user manual carefully before using the packraft. It contains important information about safe use, assembly, maintenance and storage.
Keep this manual for future reference.
- SAFETY
Paddling always involves a certain level of risk. Familiarize yourself with the packraft and its equipment before setting out, and always adapt your use to your own skills and the local conditions.
For the safest possible use:
- Always wear a suitable and correctly fitted personal flotation device (PFD).
- Inspect the packraft, valves and accessories before every trip. Do not use the packraft if it has damage or leaks that could affect safety.
- Always assess the weather, wind, currents and water temperature before entering the water. Conditions can change rapidly.
- Adapt your trip to your own skills and experience. Take particular care when paddling in cold water, strong currents, rivers or rapids.
- Never exceed the maximum load capacity of the packraft. Refer to the specifications for your model.
- Keep the packraft away from sharp objects, pointed rocks and other hazards that could damage the tubes or floor.
- Children must be supervised by a responsible adult when using the packraft.
- Always comply with local rules and regulations relating to activities on the water.
- TECHNICAL SPECIFICATIONS
Included with the packraft:
1 × packraft
1 × inflatable seat
1 × inflatable backrest
1 × tracking fin
1 × inflation bag
1 × storage bag
1 × packing strap
1 × repair kitNote: Paddle not included.
See Kiparapackraft.com for specifications for your particular model.
- BEFORE FIRST USE
Before using the packraft for the first time, inspect the packraft and all supplied equipment for damage and leaks.
Inflate the seat and backrest first, followed by the packraft.
Inspect the tubes, floor, seams, attachment points and valves.
If you suspect a leak, the area can be checked using soapy water. Bubbles that continue to form may indicate a leak.
Do not use the packraft if you discover damage or leaks that could affect safety.
- INSTALLING THE SEAT AND BACKREST
The seat and backrest should be inflated and installed before inflating the packraft itself, as they may be difficult to position once the packraft is fully inflated.
Seat
- Inflate the seat by mouth, with the inflation bag or with an electric pump through the one-way valve.
- Position the seat at the rear of the packraft and secure the buckle to the attachment point in the floor to keep the seat in position.
- Adjust the amount of air to achieve the desired level of comfort.
Backrest
- Open the valve on the permanently attached inflation tube, inflate the backrest by mouth and close the valve securely.
- Attach the two backrest straps to the attachment points at the rear of the packraft.
- Adjust the straps and air pressure until you achieve a comfortable seating position with adequate support.
- PREPARATION AND INFLATION
All KIPARA packrafts are supplied with an inflation bag. A rechargeable electric pump, sold separately, may also be used. When using an electric pump, we recommend carrying the inflation bag as a backup in case the pump battery runs out.
Unroll the packraft completely on a clean and level surface. Make sure the surface is free from sharp stones, branches and other objects that could damage the material.
- Open the main valve completely. The one-way valve insert should not remain in the opening. Screw the inflation bag onto the valve. If using an electric pump, select a nozzle that fits the packraft valve.
- Open the inflation bag and fill it with air.
- Close the opening of the inflation bag and press the air into the packraft.
- Repeat until the packraft has taken its correct shape and air begins to escape back between each inflation cycle.
- Unscrew the inflation bag from the valve and quickly close the main valve to minimise air loss.
- Remove the nozzle from the inflation bag so that the one-way valve can be used. Fill the inflation bag with air and top up the packraft.
- If necessary, additional air can be added by mouth through the one-way valve.
- Close the valve completely and make sure it is correctly seated before putting the packraft on the water.
The packraft should feel firm and maintain its shape, but it must not be inflated to the point where unnecessarily high pressure develops in the tubes.
Air pressure and temperature
The air pressure inside the packraft is affected by temperature. When an inflated packraft is placed on cold water, the air inside the tubes cools and the pressure may decrease. The packraft may therefore feel softer after a few minutes of paddling. If this happens, go ashore and add air as required.
Similarly, air pressure can increase if the packraft is left in strong sunlight or high temperatures. Check the packraft regularly and release some air if the tubes become excessively firm. This reduces the risk of damage caused by excessive pressure.
- INSTALLING AND USING THE SPRAY DECK
If the packraft is equipped with a permanently attached spray deck with a drawcord, designed to protect the paddler and the inside of the packraft from water and spray. When not in use, the spray deck can be rolled aside.
- Unroll the spray deck and make sure it is correctly positioned and not twisted.
- Sit in the packraft and pull the spray deck into position around the seating area.
- Tighten the opening around your body so that the deck fits comfortably and provides the desired protection against water and spray.
- Make sure the spray deck sits evenly and does not restrict your freedom of movement.
When the spray deck is not required, loosen the drawcord and roll the deck aside. Secure it so that it does not remain loose or interfere with paddling.
- INSTALLING AND USING THE FIN
The fin helps the packraft maintain a straighter course while paddling.
- Wet the fin with water before installation to reduce friction, then slide it into the fin mount underneath the packraft.
- Make sure the fin is correctly positioned and securely attached before putting the packraft on the water.
- If the design allows, the fin can be secured with a cord to a suitable attachment point on the packraft.
Remove the fin when paddling in very shallow water where it could come into contact with rocks or the bottom. The fin should also be removed before pulling the packraft ashore to prevent damage to the fin or fin mount.
- LOAD AND BAGGAGE
- Never exceed the packraft’s maximum load capacity. The load capacity includes paddler(s), baggage and all other equipment. Refer to the technical specifications for your mode on kiparapackraft.com
- Distribute the weight as evenly as possible to maintain good balance and stability.
- Secure all baggage and loose equipment so that it cannot shift or fall out while paddling. External baggage must be attached to the designated attachment points on the packraft.
- Do not allow sharp or pointed objects to rest directly against the tubes or floor. Wrap such items securely to reduce the risk of punctures or other damage.
- USE ON WATER
- Choose a suitable location for entering and exiting the packraft. Avoid allowing the floor to come into contact with sharp rocks or other objects.
- Take particular care when paddling in shallow water or in areas containing rocks, branches or other obstacles that could damage the floor or tubes.
- Do not use the paddle to push or force the packraft over rocks or other obstacles.
- When moving the packraft on land, lift it using the handle inside the packraft. Do not lift the packraft by the spray deck, as this may damage the deck. Do not drag a loaded packraft across the ground, as this can cause unnecessary wear or damage to the floor.
- REPAIRS
For longer trips, we recommend bringing the supplied repair kit, which is suitable for the packraft material.
Repairing small punctures
- Inflate the packraft and locate the leak. If necessary, use soapy water to identify small leaks. Mark the affected area and then deflate the packraft.
- Clean and dry the area thoroughly. The surface must be clean and dry before carrying out the repair.
- Select a suitable repair patch for the area to be repaired. Position the patch over the puncture and mark the area around it.
- Follow the adhesive manufacturer’s instructions regarding application and curing time. Apply adhesive to the repair area and patch as instructed.
- Press the patch firmly into position and work from the centre outwards to remove any air pockets, folds or wrinkles.
- Allow the repair to cure according to the adhesive manufacturer’s instructions before reinflating and using the packraft.
Major damage
Large tears, damage to seams or damage around valves should not be repaired in the same way as small punctures. Contact your dealer if you are unsure whether the damage can be safely repaired.
Do not use the packraft until the damage has been properly repaired.
- CLEANING, MAINTENANCE AND STORAGE
- Rinse the packraft with fresh water after use, especially after use in salt water.
- Remove sand, mud and other dirt.
- If necessary, use a mild cleaning agent. Avoid strong chemicals and solvents.
- Allow the packraft to dry completely before packing it away.
- Regularly inspect valves, seams/welds and attachment points.
- Deflate the packraft and roll or fold it without creating sharp creases.
- Store the packraft in a dry location protected from direct sunlight, excessive heat, sharp objects and heavy loads.
- TROUBLESHOOTING
The Packraft loses a small amount of air pressure
Possible cause: Temperature change, for example when the packraft is placed in cold water.
Solution: Add air as required.The Packraft continues to lose air
Possible cause: Leak or valve problem.
Solution: Inspect the valve and perform a leak test.Valve is leaking
Possible cause: Dirt or incorrectly seated valve.
Solution: Inspect and clean the valve.Seat or backrest loses air
Possible cause: Leak or valve problem.
Solution: Inspect the valve and check for leaks.The fin is loose or comes off
Possible cause: Incorrect installation.
Solution: Make sure the fin is correctly installed in the fin mount.Visible tape around welded areas
On some models, remnants or edges of tape may be visible on the inside near the spray deck or floor. This tape is used to hold the materials in place during production before the components are welded together.
Visible tape does not, by itself, indicate that a seam has separated or failed.
Please visit our YouTube channel for more tips: